
When to Use the Continental Stitch
I like to use this stitch for any small areas. This stitch has medium coverage. Using it a lot on bigger areas can cause the canvas to skew a little bit, which makes it a little harder to "block" when you finish stitching.
- Pros: This stitch is fast and provides a medium amount of coverage.
- Cons: It can distort the canvas.
What Continental Should Look Like

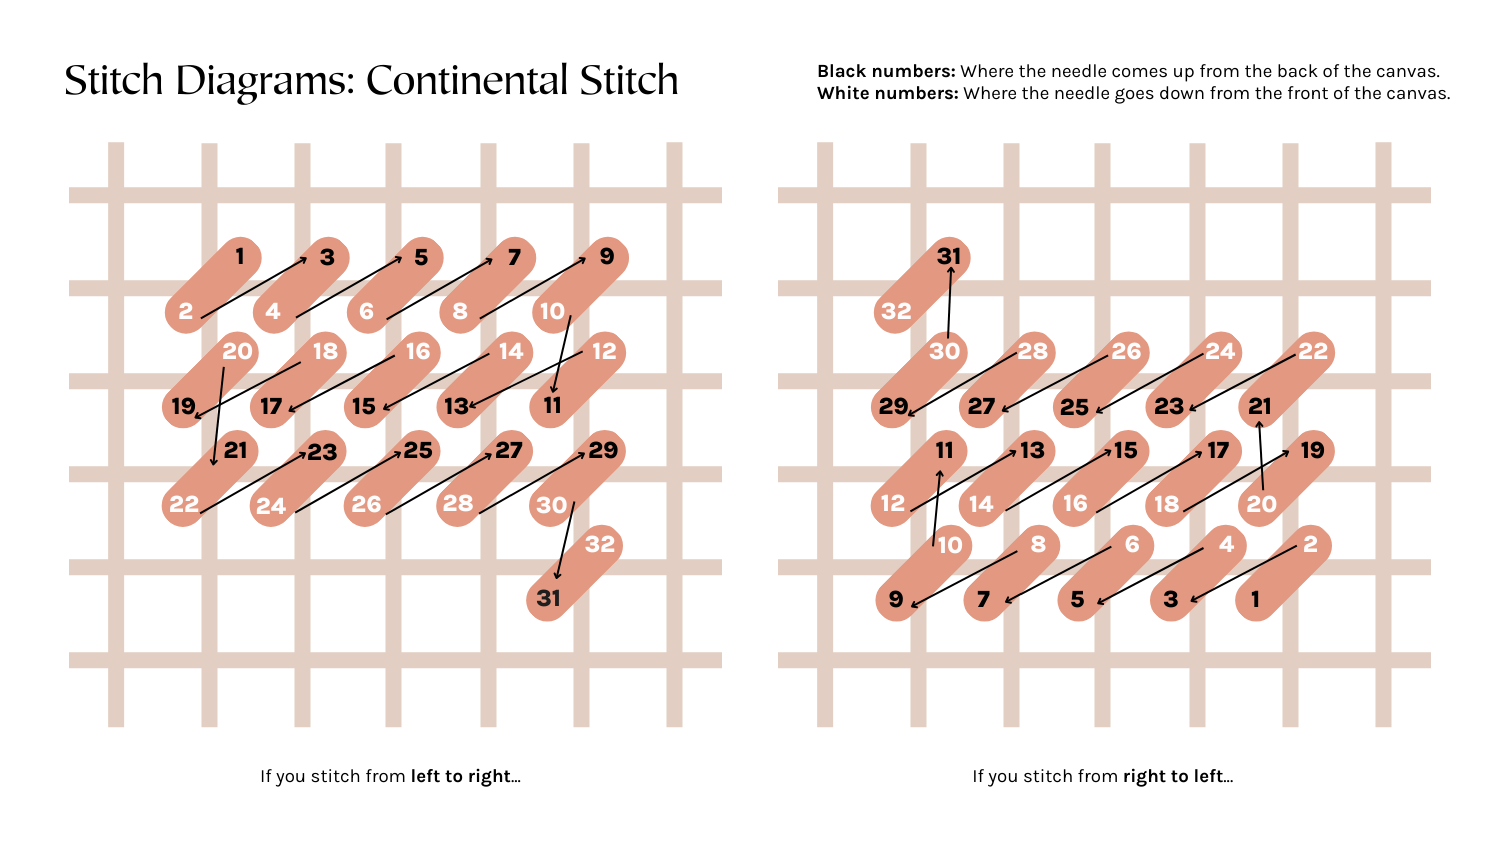
How to Work the Continental Stitch
The Continental stitch is a versatile diagonal stitch that provides good coverage on the back of the canvas. Essentially, with a Continental stitch, you are wrapping the yarn around the intersection.
When working in horizontal rows, you will stitch from right to left. When working in vertical rows, you will stitch from top to bottom.
When working in horizontal rows, you will stitch from right to left. When working in vertical rows, you will stitch from top to bottom.

To stitch, bring your needle up from the back at the bottom left of a canvas square and down into the top right, diagonally covering one canvas intersection.
For a horizontal row, bring your needle up in the hole directly to the left of your first stitch's starting point to begin the next stitch. For a vertical row, bring your needle up in the hole directly below your first stitch's starting point. At the end of any row, turn the canvas 180 degrees to begin the next row, which helps maintain consistent tension.
You'll feel (and can see) on the back of the canvas that the intersection is completely encased in yarn. The back is a mirror image (though probably a little messier) than the front of the canvas with a bunch of diagonal stitches.
Stitching Continental Vertically


This is a diagram shows how I stitch Continental. I am right-handed, and am most comfortable stitching from right to left.
No matter how hard I try, I cannot learn how to stitch that second row from left to right. So when I get to a row that requires me to switch stitching directions, I have to turn the canvas around 180 degrees.
No matter how hard I try, I cannot learn how to stitch that second row from left to right. So when I get to a row that requires me to switch stitching directions, I have to turn the canvas around 180 degrees.
I’ve tried to show by turning the numbers upside down when I typically flip the canvas. It’s a little confusing to look at, but hopefully this (along with all the how-to videos) will help you learn the simplest way to stitch.
This looks confusing, but I’ve tried to show how I stitch if the:
- The first row (pink) ends up being the top row, you should follow the pink and yellow stitch pattern
- The first row (pink) ends up being the bottom row, you should follow the pink and green stitch pattern

